

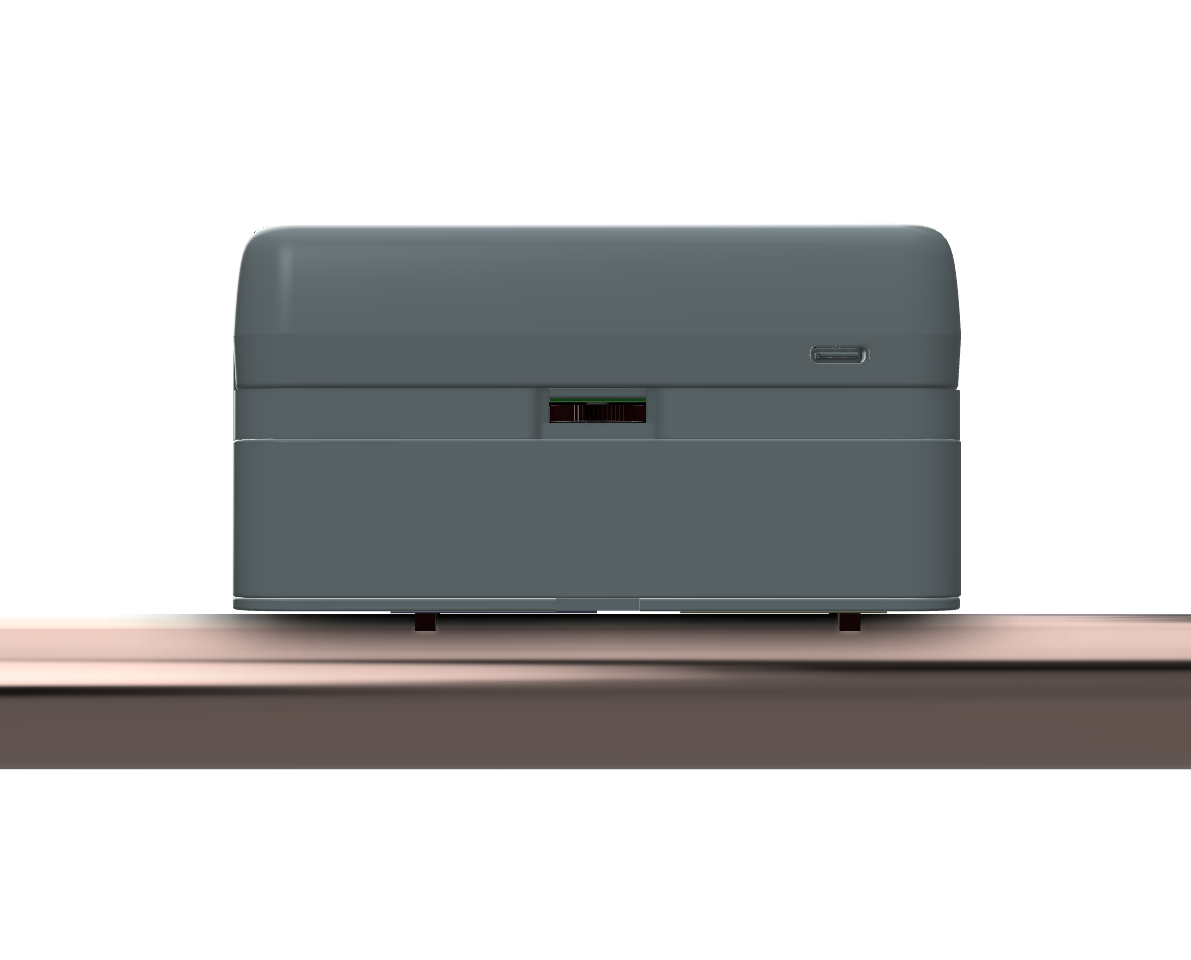
The water sensor clamp measures the flow and temperature in a water pipe using a "Time of Flight" measurement method and transmits the data wirelessly. By analyzing the flow internally, water leaks and other anomalies are detected, and the owner is alerted.
The device is clamped onto the outside of the water pipe without interrupting the water supply. Its flexible design and innovative software allow it to be used on water pipes between 16 and 50 mm, with many currently available materials on the market such as PEX, PEX AL, copper or PE. It meets all requirements of the European Community's Measuring Instruments Directive (MID). With only 60 mm of space required above the water pipe and a length of 110 mm, the device is very flat and short, making it easy to install.
The device can be powered either via USB-C or two AA alkaline cells. Whenever an external power source is available, it is used independently of the inserted batteries.
The system communicates via Wi-Fi and is controlled by an app on a mobile phone. Additionally, data can be sent to an MQTT server or an HTTP 'webhook' to be integrated into a smart home system.
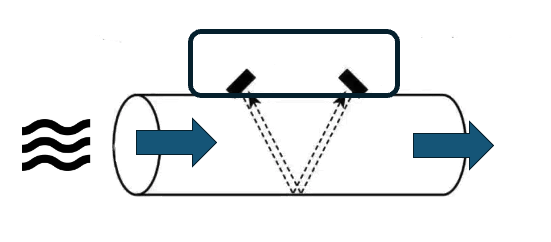
The test signal of the device has a frequency of 1 MHz and is of very low power, making it inaudible and harmless to humans and animals. Furthermore, the sound waves of this high frequency are strongly attenuated by the atmospheric pressure of the air and, in practice, cannot radiate beyond the pipe. Therefore, the water sensor clamp will not disturb people or other devices.
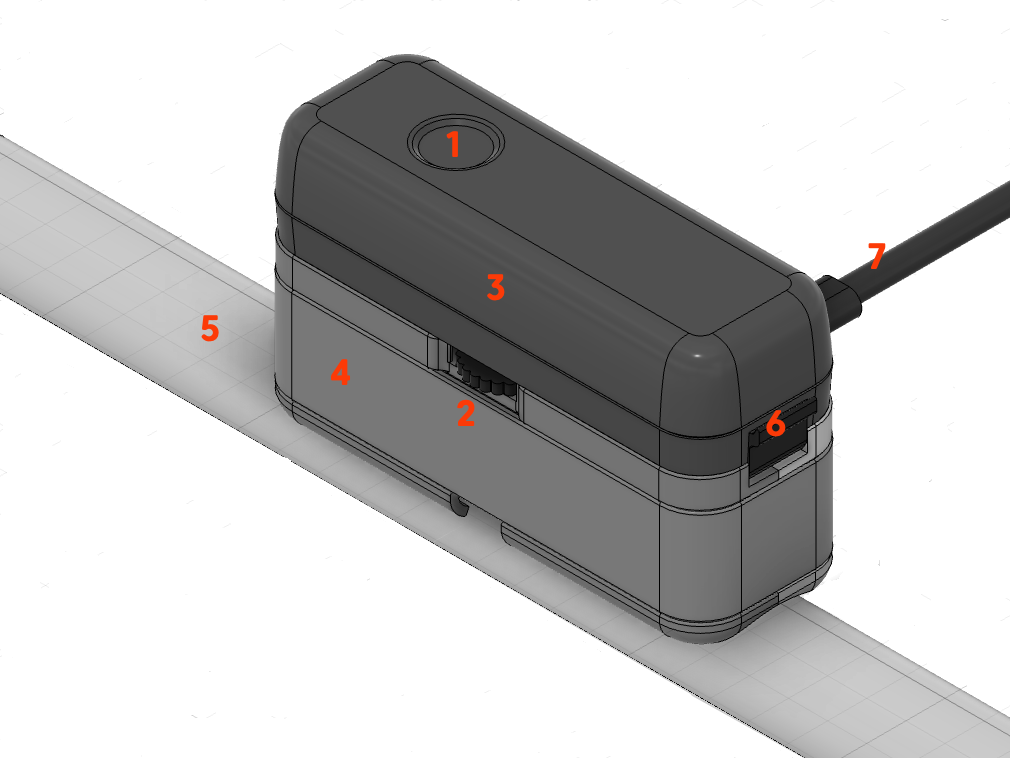
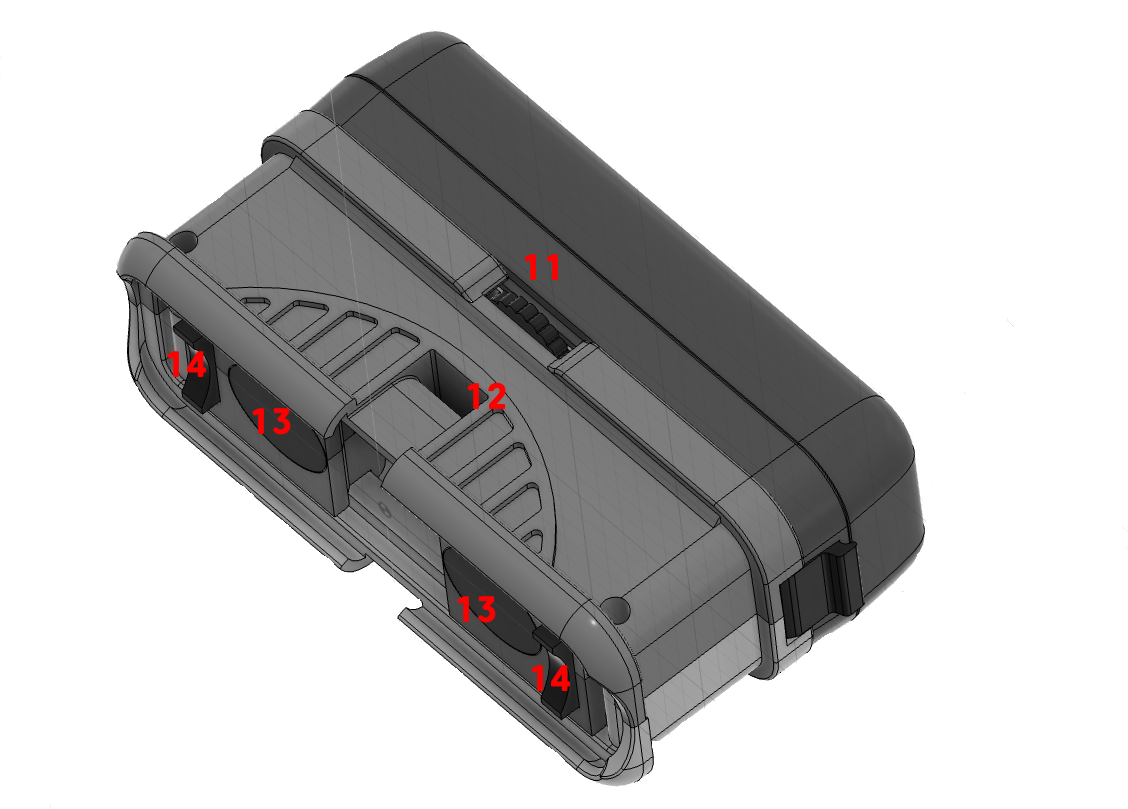
The sensor consists of two main components:
During operation, the capsule is firmly connected to the base. For maintenance purposes or for battery replacement, it can be safely separated from the base. If the capsule is powered without the base, a corresponding alarm message will be issued, and no water consumption measurement is possible.
|
|
When the device is powered on, the LED should blink slowly in red and green, indicating the factory default state.
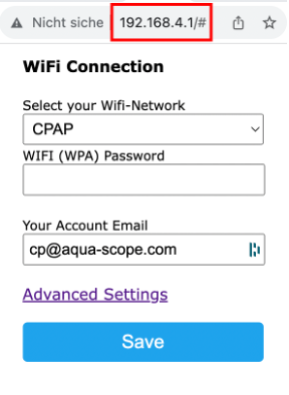
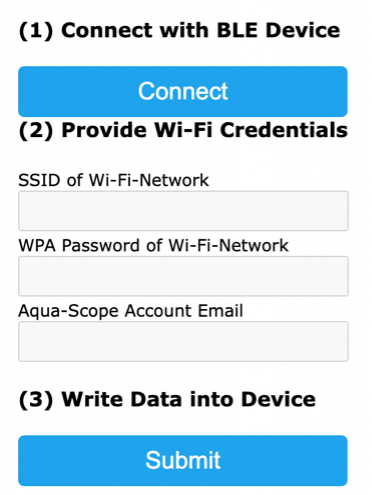
You can connect the device to a Wi-Fi network only in its factory default state. To reset the device to its factory settings, use the button sequence described in the "Button Operation" section. To enable Wi-Fi communication, you need to provide the following information:
We recommend placing the device close to the Wi-Fi router for initial connection. After successfully connecting, move the device to its final installation location and check if it reconnects to the Wi-Fi. If it does not, there might be insufficient Wi-Fi coverage at that location, requiring a Wi-Fi repeater. In networks with multiple repeaters (Wi-Fi mesh), it may take some time for the device to connect to the most suitable repeater.
Recommended for ease of use, especially if you have limited technical knowledge or plan to control the device using the Aqua-Scope App. The "Wireless Communication" section provides information on installing and using the app. When using the app, you must first create an Aqua-Scope User ID, which will automatically bind the device to your account and app.
Convenient method: Connects the device to Wi-Fi with just two button presses, though additional configuration steps are required for Aqua-Scope App use. Many modern routers have a WPS (Wi-Fi Protected Setup) function, enabling quick connections without entering the network name or password.
To connect: Press the WPS button on your router or follow its instructions to activate WPS mode. On the device (in factory default state), keep the central button pressed for 4 seconds (4 times beep). The LED will blink rapidly, indicating WPS mode is active. If the connection succeeds, the LED will stop blinking red/green, showing the device is connected to the Wi-Fi. After a successful connection, you can access the device's web interface by navigating to http://scope.local using a web browser on the same Wi-Fi network.
A robust method that works with all devices, even older or less common ones. In factory default mode, the device operates as an open Wi-Fi access point with the SSID 'Scope.' Connect your mobile device or PC to this SSID.
The installation location and proper attachment of the sensor to the pipe have a decisive influence on the accuracy of the measurement. An unfavorable installation location or incorrect attachment of the sensor can, in extreme cases, result in the s ensor not providing any measurement results.
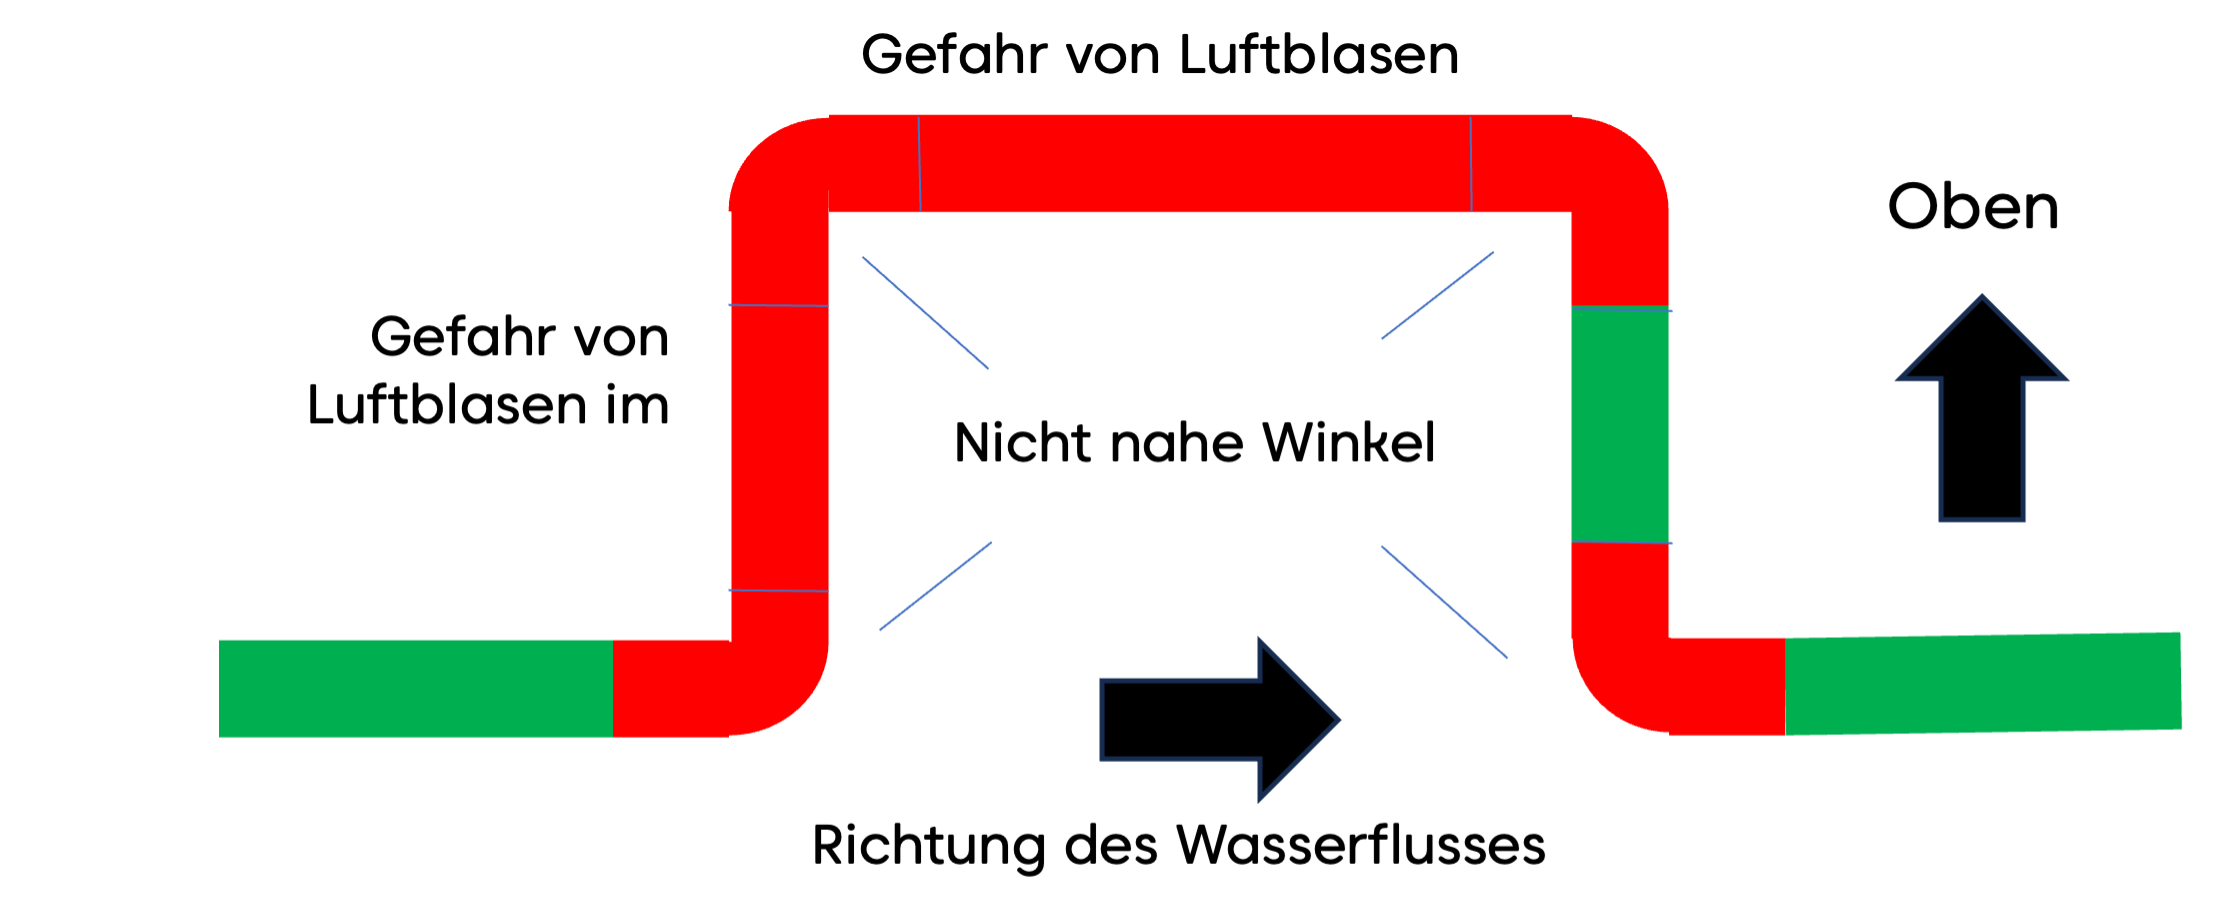
(1) For accurate measurement, the water must be free from turbulence and air bubbles. Therefore, the device should not be installed near pipe bends or other water installations such as main shut-off valves, check valves, or pressure reducers. It must be ensured that there is a minimum distance of 20 cm on each side of the pipe bends, etc., and that the installation point does not allow accumulation of small air bubbles, which occur whenever water flows quickly through the pipe. The figure below provides some hints for the best installation position.
(2) The pipe at the installation site must be smooth and free of rust, so that there are no air pockets on the outside to disrupt the measurement process. For plastic pipes, cleaning the surface is sufficient, while for metallic pipes, it may be useful to polish them with fine sandpaper.
(3) Lastly, the installation site must be reachable by radio. A stable radio connection is easiest to test by integrating the sensor into the radio network even before the final installation. Details can be found in the section 'Connection to the Radio Network'.
Note
It is recommended to connect the sensor to the radio network at the location of installation, but before the final mounting on the water pipe. However, this is not a prerequisite for installation.
| Diameter | 20 mm | 26 mm | 33 mm | 42 mm | 56 mm |
| Steel | 0 mm | 5 mm | 15 mm | 20 mm | 26 mm |
| Copper | 0 mm | 0 mm | 5 mm | 13 mm | 20 mm |
| PEX | 0 mm | 0 mm | 5 mm | 20 mm | 20 cm |
| PP | 0 mm | 0 mm | 5 mm | 15 mm | 18 mm |
Note
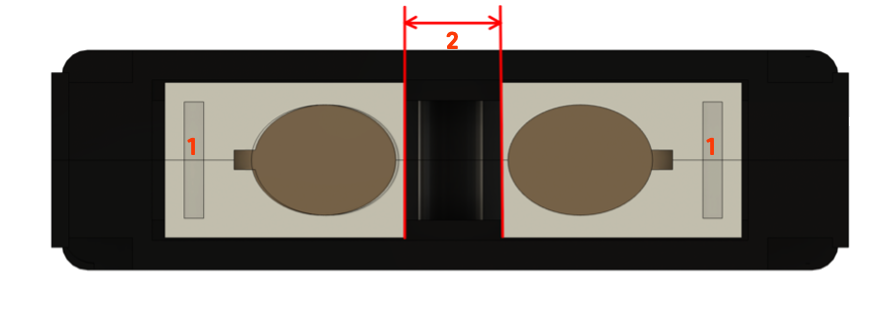
The exact positioning of the sensor on the pipe is crucial for the device's functionality and accuracy. Please adhere to the following guidelines:

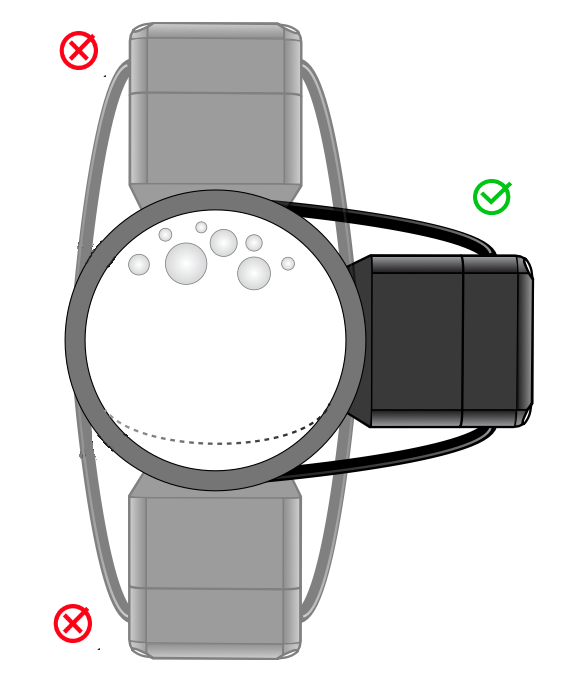
The sensor includes a built-in positioning aid that helps you:
Activating the Positioning Aid:
Press the button three times to activate the positioning aid. The sensor functions similarly to a car’s parking assistance system: The LED will blink red and yellow with varying proportions, later switching to red and green. The sensor emits beeps that change in speed based on positioning accuracy.
Guidelines
Adjustments
Modify the contact pressure or adjust the transducer distance and sensor position until the LED shows at least some green. End the process with a short press of the button. The sensor will perform a 30-second recalibration, during which the LED blinks yellow. If no acceptable position is found, the sensor will revert to blinking red, indicating it cannot yet measure water consumption. Repeating the Positioning Process: You can repeat the positioning process at any time. During operation, you can press and hold the button for three seconds to check and adjust the sensor’s position.
The sensor can be in various operating states depending on its connection status to the
network, the calibration of the measurement system, or a detected alarm. Each state is
indicated by a specific LED blinking sequence.
(1) Alternating red/yellow/green every 200 ms (fast):
The sensor is booting after powering on or performing a reset and is searching for a network connection.
(2) Alternating red/green every second (slow):
The sensor does not yet have a configured network connection and is waiting for network setup.
(3) Alternating red/green every 100 ms (fast):
The sensor is in WPS mode for quick connection to a Wi-Fi network (if available).
If any of these three LED combinations are visible, the sensor is connected to the network. It is then either in normal operation mode, alarm mode, or not yet calibrated. It is not possible to calibrate the sensor on the water pipe while no network connection is established.
(4) Red blinking for one second (slow):
The sensor has not been successfully calibrated. It will therefore only transmit temperature values but no consumption data. Calibration is required. In this state, no alarms are activated.
(5) Alternating red/green with varying lengths of green and red phases:
Feedback during calibration and positioning of the system.
(6) Yellow blinking every second (slow): Calibration after positioning.
After successful calibration and with an established network connection, there are two possible operating states. If the sensor has not yet been calibrated but is successfully mounted on a water pipe and receives a clean test signal, the calibration phase is skipped, and the sensor automatically switches to normal operating mode.
(7) Green light every 5 seconds:
The sensor is calibrated and operating normally. Temperature and consumption data are transmitted regularly, and all alarms are active. During water flow the green LED will blink fast.
(8) Red light every 5 seconds:
The sensor is calibrated and operating normally, but an alarm is active. The reason for the alarm is transmitted over the network. Once the cause of the alarm disappears, the alarm will be cleared. The alarm can also be manually cleared using the local button, even if the alarm cause is still present. The corresponding alarm cause will then remain deactivated until the next boot (power-on or reboot).
| # | State | Start | End |
| 1. | Boot | After power-on or reset | Automatically transitions to (2), (4), or (7) based on network availability or calibration status |
| 2. | Network Search | Automatically from (1) | Successful connection to the network |
| 3. | WPS | During (2), single-click | Single-click returns to (2) |
| 4. | Uncalibrated | Network successfully connected | Triple-click transitions to (5) |
| 5. | Positioning | Triple-click in (4) | Single-click transitions to (6) |
| 6. | Calibration | Single-click in (5) | Ends automatically after 30 seconds |
| 7. | Normal | End of (6), (1), or (2) or successful installation | Transitions to Alarm |
| 8. | Alarm | Alarm | Double-click clears the alarm |
When the device is connected to the local Wi-Fi, its functions can be used through various communication methods (even parallel):
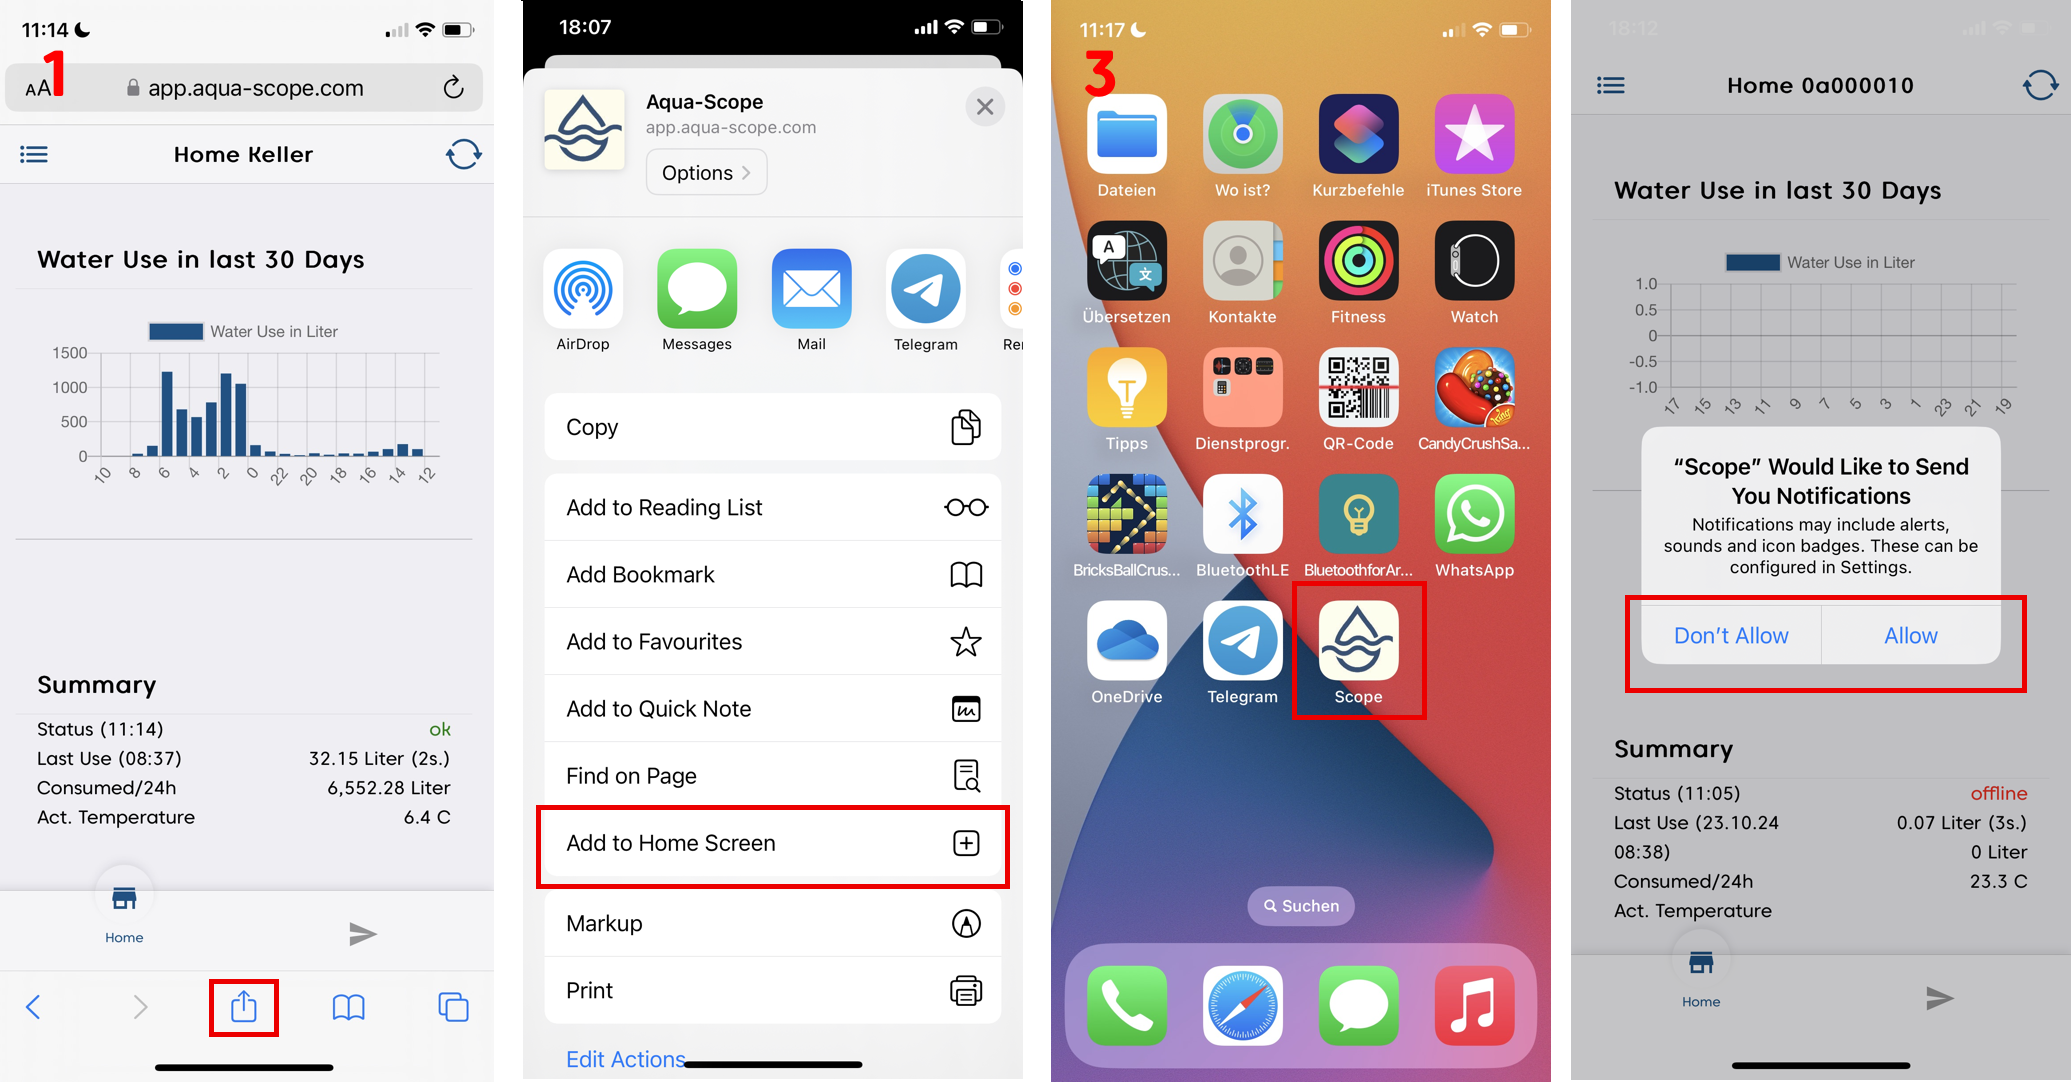
If a condition for an alarm occurs, the alarm is indicated locally on the device by red blinking and is transmitted via radio and displayed in the app. If the conditions for the alarm disappear, it is automatically cleared. An alarm can also be cleared directly on the device by pressing a button. The cleared alarm will not be triggered again for at least one hour, even if the alarm condition would require it. This prevents the alarm from being triggered again.
The device can be powered either via a USB-C power adapter (included in the package) or with two standard AA batteries. No batteries are pre-installed upon delivery.
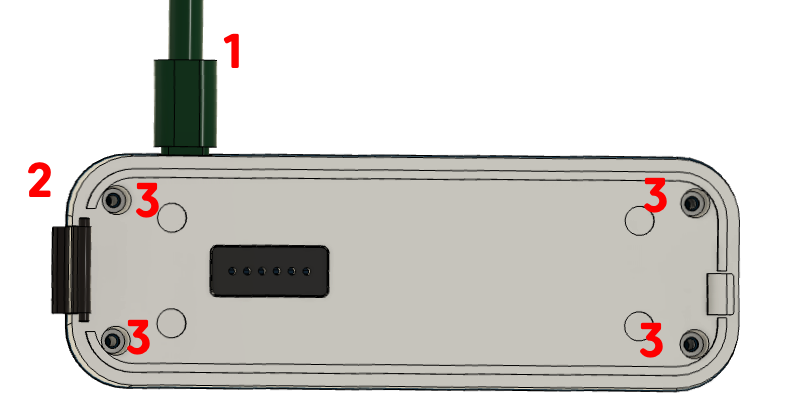
To use the device with batteries, the battery compartment must be opened:
After inserting two AA batteries (1.5V Alkaline), reattach the cover and secure it with the four screws. At this point, the red LED will blink to indicate an alarm, as the electronic module has been removed from the sensor base. The alarm will be automatically cleared once the electronic module is reattached to the sensor base.
Whenever an external power source is available, it will be used regardless of whether batteries are installed.
To minimize power consumption in battery mode, the following adjustments are made:
All other functions of the device, such as leakage detection and drip detection, continue to operate as usual.
Should you encounter any problem, please give us the opportunity to address it before returning this product. Please check our website www.aqua-scope.com and particularly the support section for answers and help. You can also send a message to info@aqua-scope.com.
While the information in this manual has been compiled with great care, it may not be deemed an assurance of product characteristics. Aqua-Scope shall be liable only to the degree specified in the terms of sale and delivery. The reproduction and distribution of the documentation and software supplied with this product and the use of its contents is subject to written authorization from Aqua-Scope. We reserve the right to make any alterations that arise as the result of technical development.
 Aqua-Scope Technology OÜ, Sakala 7-2, 10141 Tallinn, Republic of Estonia, declares that
this radio emitting device works on the following frequences:
Български С настоящото Aqua-Scope Technology OÜ декларира, че този тип радиосъоръжение AQMWIE01 е в съответств ие с Директива 2014/53/ЕС. Цялостният текст на ЕС декларацията за съответствие може да се намери н а следния интернет адрес: www.aqua-scope.com/ce.
Čeština Tímto Aqua-Scope Technology OÜ prohlašuje, že typ rádiového zařízení AQMWIE01 je v souladu se směrnicí 2014/53/EU. Úplné znění EU prohlášení o shodě je k dispozici na této internetové adrese: www.aqua-scope.com/ce.
Dansk Hermed erklærer Aqua-Scope Technology OÜ, at radioudstyrstypen AQMWIE01 er i overensstemmelse med direktiv 2014/53/EU. EUoverensstemmelseserklæringens fulde tekst kan findes p følgende internetadresse: www.aqua-scope.com/ce.
Deutsch Hiermit erklärt Aqua-Scope Technology OÜ, dass der Funkanlagentyp AQMWIE01 der Richtlinie 2014/53/EU entspricht. Der vollständige Text der EU-Konformitätserklärung ist unter der folgenden Internetadresse verfügbar: www.aqua-scope.com/ce.
Eesti Käesolevaga deklareerib Aqua-Scope Technology OÜ, et kesolev raadioseadme tp AQMWIE01 vastab direktiivi 2014/53/EL nuetele. ELi vastavusdeklaratsiooni tielik tekst on kttesaadav jrgmisel internetiaadressil: www.aqua-scope.com/ce
English Hereby, Aqua-Scope Technology OÜ declares that the radio equipment type AQMWIE01 is in compliance with Directive 2014/53/EU. The full text of the EU declaration of conformity is available at the following internet address: www.aqua-scope.com/ce
Español Por la presente, Aqua-Scope Technology OÜ declara que el tipo de equipo radioeléctrico AQMWIE01 es conforme con la Directiva 2014/53/UE. El texto completo de la declaracin UE de conformidad está disponible en la direccin Internet siguiente: www.aqua-scope.com/ce
Ελληνικά Με την παρούσα ο/η Aqua-Scope Technology OÜ, δηλώνει ότι ο ραδιοεξοπλισμός AQMWIE01 πληροί την οδηγία 2014/53/ΕΕ. Το πλήρες κείμενο της δήλωσης συμμόρ φωσης ΕΕ διατίθεται στην ακόλουθη ιστοσελίδα στο διαδίκτυο: www.aqua-scope.com/ce
Français Le soussigné, Aqua-Scope Technology OÜ, déclare que l'équipement radioélectrique du type AQMWIE01 est conforme la directive 2014/53/UE. Le texte complet de la déclaration UE de conformité est disponible l'adresse internet suivante: www.aqua-scope.com/ce
Hrvatski Aqua-Scope Technology OÜ ovime izjavljuje da je radijska oprema tipa AQMWIE01 u skladu s Direktivom 2014/53/EU. Cjeloviti tekst EU izjave o sukladnosti dostupan je na sljedećoj internetskoj adresi: www.aqua-scope.com/ce
Italiano Il fabbricante, Aqua-Scope Technology OÜ, dichiara che il tipo di apparecchiatura radio AQMWIE01 conforme alla direttiva 2014/53/UE. Il testo completo della dichiarazione di conformit UE disponibile al seguente indirizzo Internet: www.aqua-scope.com/ce
Latviešu Ar šo Aqua-Scope Technology OÜ deklarē, ka radioiekārta AQMWIE01 atbilst Direktīvai 2014/53/ES. Pilns ES atbilstības deklarācijas teksts ir pieejams šādā interneta v ietnē: www.aqua-scope.com/ce Lietuvių Aš, Aqua-Scope Technology OÜ, patvirtinu, kad radijo įrenginių tipas AQMWIE01 atitinka Direktyvą 2014/53/ES. Visas ES atitikties deklaracijos tekstas prieinamas šiuo internet adresu: www.aqua-scope.com/ce
Magyar Aqua-Scope Technology OÜ igazolja, hogy a AQMWIE01 típus rádiberendezés megfelel a 2014/53/EU irányelvnek. Az EUmegfelelőségi nyilatkozat teljes szövege elérhető a következő internetes címen: www.aqua-scope.com/ce
Malti B'dan, Aqua-Scope Technology OÜ, niddikjara li dan it-tip ta' tagħmir tar-radju AQMWIE01 huwa konformi madDirettiva 2014/53/UE. It-test kollu tad-dikjarazzjoni ta' konformit tal-UE huwa disponibbli f'dan l-indirizz talInternet li ġej: www.aqua-scope.com/ce
Nederlands Hierbij verklaar ik, Aqua-Scope Technology OÜ, dat het type radioapparatuur AQMWIE01 conform is met Richtlijn 2014/53/EU. De volledige tekst van de EUconformiteitsverklaring kan worden geraadpleegd op het volgende internetadres: www.aqua-scope.com/ce
Polski Aqua-Scope Technology OÜ niniejszym oświadcza, że typ urządzenia radiowego AQMWIE01 jest zgodny z dyrektywą 2014/53/UE. Pełny tekst deklaracji zgodnośc I UE jest dostępny pod następującym adre sem internetowym: www.aqua-scope.com/ce
Português O(a) abaixo assinado(a) Aqua-Scope Technology OÜ declara que o presente tipo de equipamento de rádio AQMWIE01 está em conformidade com a Diretiva 2014/53/UE. O texto integral da declarao de conformidade está disponível no seguinte endereo de Internet: www.aqua-scope.com/ce
Română Prin prezenta Aqua-Scope Technology OÜ declară că tipul de echipamente AQMWIE01 este în conformitate cu Directiva 2014/53/UE. Textul integral al declarației UE de conformitate este disponibil la următoarea adresă internet: www.aqua-scope.com/ce
Slovensko Aqua-Scope Technology OÜ potrjuje, da je tip radijske opreme AQMWIE01 skladen z irektivo 2014/53/EU. Celotno besedilo izjave EU o skladnosti je na voljo na naslednjem spletnem naslovu: www.aqua-scope.com/ce
Slovensky Aqua-Scope Technology OÜ týmto vyhlasuje, že rádiové zariadenie typu AQMWIE01 je v slade so smernicou 2014/53/EÚ. Úplné EÚ vyhlásenie o zhode je k dispozícii na tejto internetovej adrese: www.aqua-scope.com/ce
Soumi Aqua-Scope Technology OÜ vakuuttaa, että radiolaitetyyppi AQMWIE01 on direktiivin 2014/53/EU mukainen. EUvaatimustenmukaisuusvakuutuksen täysimittainen teksti on saatavilla seuraavassa internetosoitteessa: www.aqua-scope.com/ce
Svenska Härmed försäkrar Aqua-Scope Technology OÜ att denna typ av radioutrustning AQMWIE01 verensstmmer med direktiv 2014/53/EU. Den fullständiga texten till EUförsäkran om verensstämmelse finns på följande webbadress: www.aqua-scope.com/ce
 Do not dispose of electrical appliances as unsorted municipal waste, use separate collection
facilities. Contact your local government for information regarding the collection systems
available. If electrical appliances are disposed of in landfills or dumps, hazardous
substances can leak into the groundwater and get into the food chain, damaging health and well-being.